Google Drive is one of the most commonly used platforms for storing and sharing files online. Whether you are sharing videos, documents, images, or large folders, Google Drive allows you to control exactly who can access your files. One of the most useful features is the ability to make a file public so anyone with the link can view or download it.
This guide explains how public sharing works, how to enable it, and what happens when you change access settings.
What Does “Public Link” Mean in Google Drive?
A public Google Drive link means that anyone who has the link can access the file without needing permission from the owner.
This does not mean the file is visible to everyone on the internet. Instead, it means:
- The file is not restricted to specific people
- Anyone with the link can open it
- No login or approval is required (depending on settings)
This feature is commonly used when sharing files with a large audience or when you want quick access without sending individual invitations.
Why People Make Google Drive Links Public
There are several practical reasons why users choose public sharing:
- Sharing videos with students or clients
- Sending large files without email attachments
- Providing download access for media files
- Collaborating with teams or groups
- Sharing resources on websites or blogs
It simplifies the sharing process and removes the need for manual permission management.
Step 1: Open Google Drive
To begin, go to Google Drive and log in with your Google account.
Once inside, locate the file you want to share. This can be a video, PDF, image, or any other file stored in your Drive.
Make sure you are the owner of the file or have editing permissions. Only file owners or editors can change sharing settings.
Step 2: Select the File You Want to Share
Right-click on the file you want to make public. A menu will appear with several options.
From this menu, click on “Share”. This will open the sharing settings window, where you can control access levels.
This is the main control panel for all permissions related to the file.
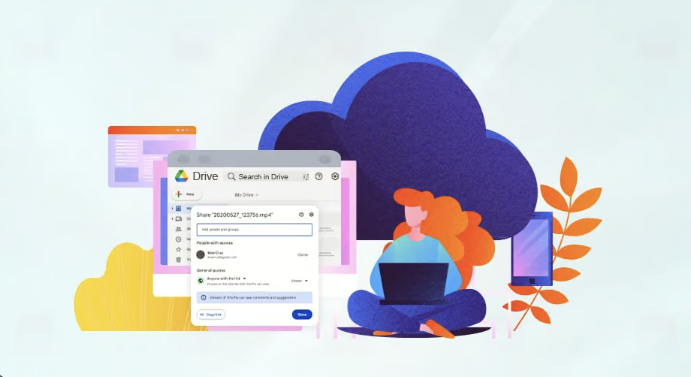
Step 3: Open Sharing Settings
Once you click “Share,” a new window will appear showing current access settings.
By default, most files are set to:
- Restricted access (only specific people can view)
In this state, even if someone has the link, they cannot open the file unless they are added manually.
Step 4: Change Access to “Anyone with the Link”
In the sharing settings window, look for the section called “General access.”
Click on the dropdown menu. You will see different options such as:
- Restricted
- Anyone with the link
Select “Anyone with the link” to make the file publicly accessible through the link.
This is the key step that enables public sharing.
Step 5: Choose Permission Level
After enabling “Anyone with the link,” you also need to set the permission type.
Google Drive offers three main roles:
- Viewer
- Commenter
- Editor
For public download purposes, you should select the Viewer.
This ensures that:
- Users can view the file
- Users can download the file
- Users cannot edit or delete the file
This is the safest option for public sharing.
Step 6: Copy and Share the Link
Once the settings are updated, click on the Copy link button.
This link can now be shared anywhere:
- Websites
- Emails
- Social media
- Messaging apps
Anyone who opens the link will now have access based on the permission you selected.
How Public Links Work in Google Drive
When a file is set to public access, Google Drive generates a simple sharing system.
Here is what happens behind the scenes:
- The file is stored securely in your Drive
- Google assigns a unique shareable link
- Access is controlled only through that link
- No username or password is required for viewers
This system makes sharing fast while still keeping control in the hands of the file owner.
Public vs Restricted Access
Understanding the difference between these two settings is important.
Restricted Access
- Only selected users can access
- Requires email invitation
- Fully private sharing
Public Access (Anyone with the link)
- Anyone with the link can open it
- No invitation required
- Easier for wide sharing
Restricted mode is better for private data, while public mode is used for general sharing.
Safety Considerations When Making Links Public
While public sharing is useful, it should be used carefully.
Once a file is public, anyone with the link can access it. This means:
- The link can be forwarded to others
- It may reach unintended users
- You lose direct control over who views it
For this reason, it is recommended to only make files public when necessary.
How to Stop Public Access Later
If you want to remove public access, you can easily change it back.
To do this:
- Open the same sharing settings
- Change “Anyone with the link” back to “Restricted.”
Once changed, the link will no longer work for public users.
This gives you full control over your files at any time.
Common Issues with Public Links
Sometimes users face issues even after making a link public.
1. Link still shows access denied
This usually happens if the settings were not saved properly.
2. File not opening on mobile
Some browsers may require you to sign in even for public links.
3. Download option not visible
This can occur if the file owner disables downloading permissions.
Why Google Drive Uses This System
Google Drive uses permission-based sharing to balance convenience and security.
Without these controls:
- Private files could be exposed
- Sensitive data could be shared accidentally
- Users would lose control over their content
By using adjustable access levels, Google ensures flexibility while maintaining privacy protection.
Final Thoughts
Making Google Drive links public is a simple process, but it is important to understand how the permission system works. Once you set a file to “Anyone with the link” and choose viewer access, your file becomes easily shareable without needing individual invitations.
This feature is especially useful for sharing videos, documents, and large files with a wider audience while still keeping basic control over access.
Used correctly, it makes file sharing faster, simpler, and more efficient without compromising control over your content.


")


